Find you way back…

Main Properties

  • Text – the text of the “label” i.e. the text shown next to the field where you enter information.
  • Check align – the label’s position in relation to the field where you enter information
  • Tooltip text – text that will display when you hover the mouse over that control
  • Output destination – part of the clinical notes that the text will be copied into e.g. history. Add output on same line – you can choose to add the “output” on the same line as text you have previously entered or on a new line.
  • Name – name of the control. This can be different from the “label” text – if you send the results of this control, it will be sent under the “name” while the “label” text is what will show up when you open the form.
  • Required – whether or not the question must be answered. Check the box to make the control mandatory.
  • Save back – save the question and answer to the patient’s records, to make available for future use to pre-populate other forms (e.g. eye colour).
  • Left/top/right – position of the control (in pixel points). These act like co-ordinates. To manually line up several controls, you could ensure they all have the same value in the “left” section.
  • Tab index – the order in which you select this control when you press [Tab] to navigate around the screen. This will usually be filled in for you based on the layout of the page; however‚ you can also enter it manually. Note: to automatically order the controls, right click the screen and select “Set tab order from layout”.
  • Anchor – as you increase the size of the screen, the control will also increase in size. Select “anchor” to ensure the control stays to that side of the form.
  • Dock – ensure the control sticks to one side of the form.
  • Pre-populate – you can choose to have this control filled in automatically when you open the form. Select the type of information or a code from the list (e.g. patient’s name), and the box will be filled in based on information in the system. See the information on rules to learn about advanced pre-population.

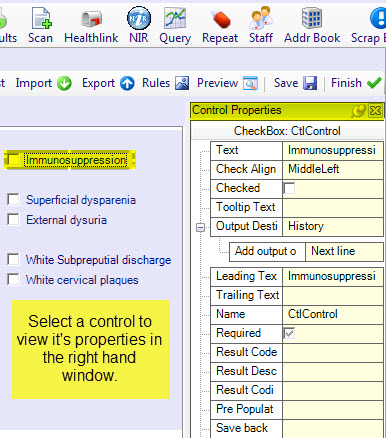
Checkbox properties:


Leading text  what is copied into the notes if the box is ticked
Trailing text what is copied into the notes if the box is unticked (or left blank).
Checked whether the box will be checked or unchecked by default. Change this by checking/unchecking the box.


Textbox properties:


Multiline whether or not you can write on more than one line.
Leading text the text that appears in the notes before the value you enter e.g.Prescribed and over-the-counter treatments tried:

Trailing text the text that appears in the notes after the value you enter e.g. for a measurement value, the trailing text may be the unit.


Radio Buttons:


List values the options for each radio button. They are entered (name of button, display name). For example, (1,None of the time), (2,A little of the time), (3,Some of the time) etc.
Selected value the value of each button. You enter these values by clicking on each individual button and entering the value, e.g. 2. These can be used for calculating totals or scores based on the answers given.


Drop-down menu properties:


List values options in the menu. They are entered: (saved value, display name). The display name is what will appear in the menu. They could be the same e.g. (yes, yes) or different e.g. (0, dry skin).
Selected value default value
Dropdown style Dropdown means you can also type values not on the list. Dropdown list means you can only choose from the list.
Max dropdown list how many values show up before the scrollbar appears.

Top