Find you way back…

Creating and editing a document template

Document Template Editor

Go to the Tools menu. Select Document Templates from the Clinical Setup submenu.

  • Select the document template you wish to edit from the list on the left. You can search for a template by typing in the blue line.

OR

  • To create a new document, click on the New Document symbol (left of the “Copy” button).

Edit The Document

  1. The document template will be displayed in the centre panel.

  2. Click in this panel and edit the text.

  3. When you are finished, click “Save”.

Place holders Tags

(for mail-merge items)

If you insert a place holder tag in your document template, it will be replaced with real values when you use the document.

Tags begin with << and end with >>.

For example, <<PatientFullName>> will be replaced with “Jane Margaret Test” when you create a document for Jane.

  1. Place the cursor in the text where you want the value to appear.

  2. Select the appropriate placeholder from the pane on the right of the page.

    • Click on the tag groups to open the lists

    • Click on the appropriate tag

  3. A new placeholder tag will be inserted at the position of the cursor in the document

Labelling your document

You should categorise your document, depending on its purpose.

  • Letter (A mail merge letter)
  • Label (To be printed as a label)
  • Handout (Patient Handouts)
  • Txt Message (Templates for SMS messages )

Code

The code is used to select the correct letter when processing recalls. If the document is to be used to invite patients for their recalls, the code must correspond to the task code. For example for letters recalling patients for cervical smears enter a code of CX (which is the task code for cervical smears).

Print style

Select the appropriate format (size) to be used when printing this document.

Some documents may not be printed at all, e.g. txt messages. In that case, select “Not Printed”.

Saved In Notes

If this box is ticked, a copy of this document (when printed or emailed) is saved in the patient’s notes.

Text Formatting

Use the font, size and style menu at the top to format the text and insert images.

Preview

Click “Preview” to see what the document will look like when printed.

Note: You may be asked to select a patient to demonstrate the replacement of tags with real values.
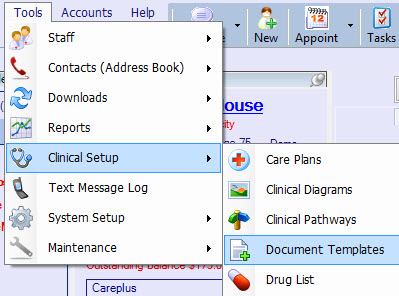
Deleting documents

Select the document template you wish to delete from the list on the left. The document template will be displayed in the centre panel.

Click “Delete” in the top menu. This will remove the document name from the list at left. The template is deleted, even though it still appears in the centre panel. You will not need to click “Save”.

Creating a copy of a document

If you want to create a document which is largely similar to another, highlight that existing document in the list. Click “Copy” in the top menu.

A new document named Copy will be created with the same body like the original.

  1. Change the Name and any of the settings
  2. Edit the document (see above).
  3. Click “Save”.
Top